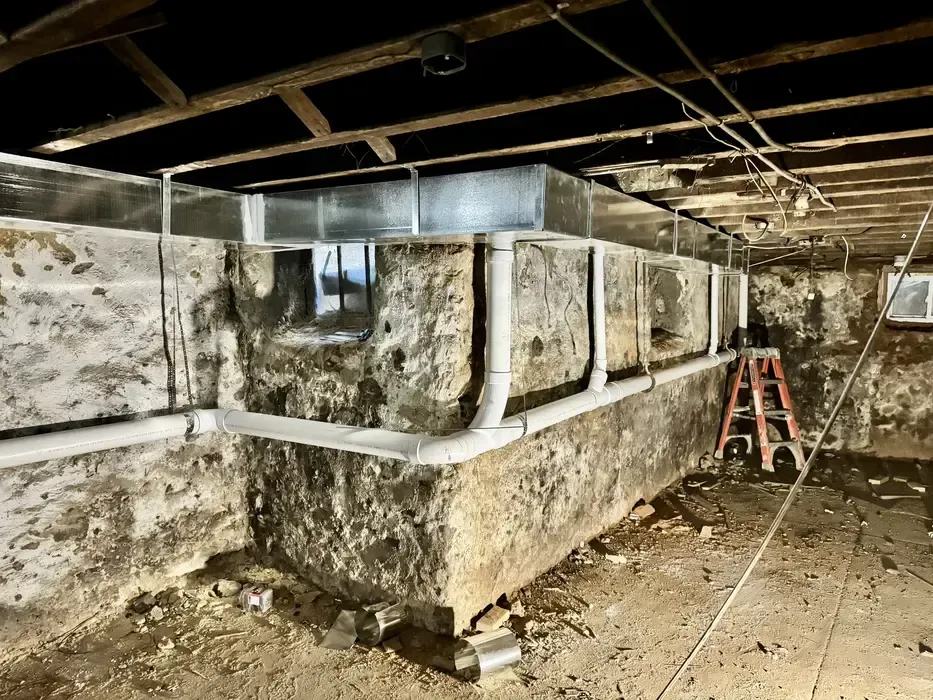
What has to happen to a damp basement before a single stud goes up
The most expensive basement I've ever been called into was finished twice. The first crew framed over a wall that wept every spring. Eighteen months later the homeowner pulled out drywall, insulation, framing, and flooring, and we started from bare block.
Nothing about that job was unusual. It's the standard failure, and it happens because the finishing work is visible and the water work isn't. Here's the order it actually has to go in.
Step one: find out where the water is coming from
Water in a basement is not one problem. It's at least four, and they have different fixes.
Groundwater pushing through the slab-to-wall joint or up through cracks shows up as damp patches low on the wall, often after heavy rain, often seasonal. Surface runoff comes in higher and faster — usually traceable to a downspout dumping against the foundation or grade sloping the wrong way. Condensation forms on cold surfaces in humid months and can soak a wall without a drop of groundwater involved. And plumbing leaks are exactly what they sound like.
The diagnostic mistake is jumping to a solution before you know which one you have. A sump pump does nothing for condensation. A dehumidifier does nothing for hydrostatic pressure.
Watch the space through at least one significant rain event. Tape a square of clear plastic sheeting tightly to a bare section of wall and leave it a few days — moisture on the room side of the plastic points to condensation, moisture behind it points to water moving through the wall. Look for efflorescence, the white mineral crust that means water has been passing through masonry for a long time.
Step two: fix everything outside before you touch anything inside
The cheapest water fix is almost always the one that happens above ground, and it's the one most homeowners skip because it doesn't feel like part of the project.
Clean the gutters. Extend the downspouts — well out from the foundation, not the two-foot splash block that came with the house. Regrade so the ground falls away from the wall for the first several feet. Check window wells for drainage and for the leaf-and-dirt plug that turns them into buckets. Look at what the neighbor's roof and driveway are doing, because in a Philadelphia rowhome your water problem is frequently somebody else's runoff.
I've watched a genuinely wet basement go dry from a morning of downspout work. Not always. But do it first, then re-watch it through another rain, because everything downstream of this step gets priced against water you may no longer have.
Step three: interior drainage, if the outside didn't solve it
If water is still coming through after the exterior is corrected, you're managing it rather than stopping it. That generally means an interior perimeter drain cut into the slab at the footing, piped to a sump pit with a pump and a sealed lid, and a battery or water-powered backup for when the power fails during the storm that needed the pump.
This is the point where the job stops being a weekend and starts being a contractor's scope. Cutting a slab means dust containment, spoil removal, and a plumber who knows where the discharge is legally allowed to go — that last one varies by municipality and is worth confirming before anyone starts cutting. Coordinating that sequence is a normal part of a basement finishing project, and it's much easier to run before framing than after.
Exterior excavation and waterproofing exists too, and it's the more permanent fix. It's also far more disruptive. For most homes in Bucks and Montgomery, interior drainage plus corrected exterior grading does the job.
Not sure which category your basement falls into? Evolution 12 will walk the space, look at it in the conditions that actually cause the problem, and give you a written scope. Request a free estimate.
Step four: test for radon while the slab is still accessible
This step gets skipped constantly, and the window to do it cheaply closes the moment you frame.
Pennsylvania has one of the most serious radon problems in the country, and testing is the only way to know whether a given house has elevated levels. DEP notes that radon levels are often highest in the basement, which makes the basement test the relevant one when you're about to turn that space into a bedroom or office. Their guidance is that results above 4 pCi/L warrant a confirming test, and if the result still comes back at 4 pCi/L or higher, corrective action is called for.
The reason this belongs here in the sequence rather than at the end: a mitigation system wants a pipe path from below the slab to above the roofline. Running that through open joists and unframed walls costs a fraction of what it costs to retrofit through finished space. If you're already cutting the slab for drainage, you're already in the right place.
Test kits are inexpensive and sold at hardware stores, or you can hire a state-certified tester. Either way, do it now.
Step five: dry the space and confirm it stays dry
Once the water is managed, the basement has to actually dry — and the masonry holds moisture long after the floor looks dry.
Run a dehumidifier with a condensate line to the sump or a drain, not a bucket somebody has to remember to empty. Get a cheap hygrometer and log the humidity over a period of weeks, through at least one wet stretch of weather. A basement that reads fine on a dry August afternoon tells you nothing.
Also handle the air side of condensation while you're at it. Uninsulated cold-water lines sweat. An unvented dryer dumps moisture into the space. A bathroom fan that terminates in the joist bay instead of outside is putting water into your structure every day.
This is the step with no visible progress, and it's the one homeowners want to compress. Don't. The whole point is to prove the fix worked before you cover it up.
Step six: control vapor, then frame
How the assembly gets built matters as much as the drainage, because a wall that traps moisture will rot whether or not water is entering.
The general principle in a climate like ours is to keep the framing off the masonry and to avoid creating a cold surface inside the wall cavity where moisture can condense. Rigid foam against the foundation wall, then framing inboard of it, is the assembly most builders in this region have moved toward. What's less debated is the mistake: fiberglass batts stuffed directly against a below-grade masonry wall, with a plastic sheet stapled over the face. That builds a condensation trap, and it's exactly what was behind the drywall in that basement we tore out twice.
Insulation values, vapor retarder placement, and any fire-separation requirements are set by code, and code is enforced locally. Philadelphia's Department of Licenses and Inspections and your township office are the authorities to confirm with — several Bucks and Montgomery municipalities use third-party UCC enforcement agencies, so the answer isn't uniform across the region. Confirm before you buy materials, not after the inspector arrives.
While the walls are open is also the moment to handle egress, since a basement bedroom has requirements a basement rec room doesn't. Cutting a masonry opening for an egress windowis a different job once framing and finishes are in.
Then the electrical, plumbing, and HVAC rough-in goes in, gets inspected, and only after that does anything get covered.
The short version
Diagnose, fix the exterior, add interior drainage if you still need it, test for radon, dry the space and verify it, control vapor, then frame. Every step out of order costs more than the step itself.
A basement that's been properly dried out is a straightforward finishing job. One that hasn't is a demolition project waiting on a calendar.
Planning a basement in Philadelphia, Bucks, or Montgomery County? Evolution 12 handles the water work and the finish work as one scope, in the right order. Request a free estimate.
Kanstantsin Bychak is the owner of Evolution 12, a licensed general contractor based in Huntingdon Valley, PA (PA License #PA164463), serving Philadelphia, Bucks County, and Montgomery County.